Friday, January 20, 2023

GPS Mapping Cart


 We were early adopters of John Deere's GPS sprayer technology and now have four units in the fleet. We have experienced operational cost savings of over 10% overall, and in some cases approaching 15%, since moving away from manual spraying. There are many areas of the property which are challenging to map due to proximity to hazards, etc. In those areas we manually spray with spray hawks or hand held nozzles, which is difficult to get consistent results and is labor intensive.

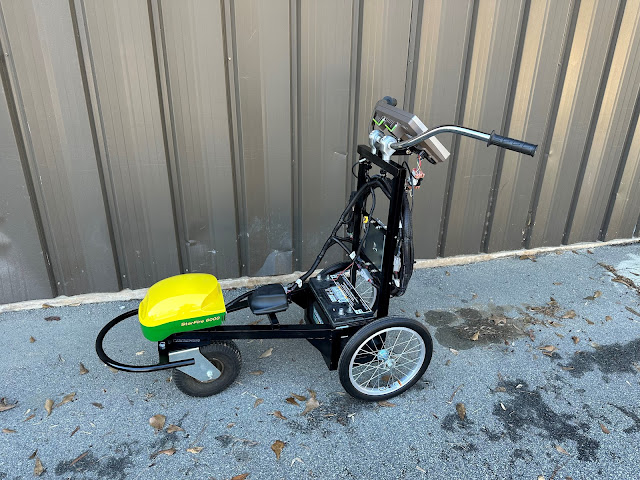
I was speaking with Stewart Laver, Greenville Turf and Tractor's "GPS Guru", and he told me about someone who had put together a GPS cart somewhere in Florida. Stewart supplied me with a parts list for the wiring harness and such, and I started looking around the shop for parts...

I found a nice large caster wheel which was originally on a ball picker, and then purchased the 16" spoked wheels from Northern. Once I had the basic parts I could draw up a basic design.


Once I had the basics laid out, I started by building the battery box around one of our Group 31 deep cycle batteries and then tied the caster wheel to it and started to think about a handlebar. I figured a wide bar would be best for good leverage, and found an old used cruiser bar at a local cycle shop. After building the upright to mount the handlebar on, it was pretty straightforward to get all the components mounted - then I had to figure out the best way to package the wiring harness.


To set up the cart for use, I harvest the Starfire Receiver, Display, and Controller from one of our sprayers. The wiring harness and cellular antenna stay with the cart when not in use. Total setup time is around 20 minutes.

I added the large U-bolt up front to use for tying off in the trailer, and to protect the Starfire from impacts.


The GPS cart has allowed us to map areas which wouldn't be practical, or safe, to map otherwise. 


Total cost for the project was around $2,500.

Monday, December 19, 2022

Level UP!

LevelUPTM Roller Mounts are a product of one man's frustrations while attempting to accurately parallel the front rollers on John Deere QA5 cutting units, and also his anguish when one of the factory brackets failed in a spectacular way, causing turf damage and embarrassment.

The back story: My assistants and I have been working with John Deere QA5 cutting units for many years, and we had all grown to dread adjusting the front roller eccentrics, a task that I felt took too long and needed to be done too often. The excessive play in the factory roller bracket assembly combined with the inherent inaccuracy of the design was the source of the frustration. Back in 2019 we had one of our front roller brackets come loose at the eccentric adjuster on a greens mower during use. Of course it happened on the (huge) main putting green, the day before our member-guest tournament. The operator said he did feel the mower pulling some, as the bedknife was digging into the canopy - for several passes across the green (it was dark, of course). 

This was the last straw for me. That day I vowed to fix those blasted mounts once and for all, and after a two year development period which involved learning new (to me) manual machining methods, TIG welding, 3D CAD modeling, and dealing with a top tier CNC machining job shop, I did it! As of this writing; we have been using LevelUPTM Roller Mounts on all of our greens cutting units at the Atlanta Athletic Club for over a year with zero issues. 

After much prodding (thanks Larry and Mark) and contemplation I have decided to bring LevelUPTM Roller Mounts to market. LevelUPTM Roller Mounts are now available through Turf Addict here! The end product has exceeded my expectations, and I have been getting great reviews from all who have tried them to-date. 

I want to share and document the development of  LevelUPTM Roller Mounts here, and explain the benefits of their use.

This was the starting point:


The JD design has three main components; the cast steel vertical and horizontal brackets, and the machined eccentric bushing which controls the position of the horizontal bracket relative to the vertical bracket. 

The three parts of the roller bracket are held together with one 10mm hex head bolt which threads into the horizontal bracket and sandwiches the vertical bracket between the horizontal bracket and the eccentric. It is interesting to note that the outer diameter of the eccentric is machined to a slight taper, so that there is an interference fit between the eccentric and the vertical bracket when the hex head bolt is tightened. I suspect this was done to save money on finish machining the cast parts. Because the parts are left as cast, there needs to be a generous clearance between the two brackets, and this clearance leads to the frustrating amount of play, or slop, when performing adjustments. The clearance also allows the horizontal bracket to move slightly when the assembly experiences the shock and vibrations of normal use. When the horizontal bracket moves, the hex head bolt threaded into it can loosen, leading to Equipment Manager meltdown...

The vertical bracket has numbers cast in which are used to index it's position relative to the side frame for setting height of cut (HOC) ranges in 5mm increments. The back side of the vertical bracket has 5mm teeth which fit together with corresponding teeth cast into the cutting unit side plate.  The roller shaft is retained in the horizontal bracket with a 6mm bolt and lock nut. The whole assembly is clamped to the side frame with one 10mm carriage bolt and lock nut through the slot in the bracket.

And after several steps, here is my solution:


My design uses a solid "L" shaped mount with a saddle on the bottom to receive an eccentric split bushing which is retained from the bottom with a two-bolt saddle clamp. When the clamp is tightened, the tight fitting split bushing is compressed around the roller shaft, creating a solid load path from the roller shaft through the part, with no joints to flex and virtually no possibility of the roller moving - and HOC changing - unintentionally. The mounts have the 5mm tooth pattern and index numbers machined in and locate the roller in the factory position. Each mount provides +/- .030" of adjustment and is fast and easy to dial in. All of the part features are CNC machined from steel bar stock, and then the parts are clear zinc plated for corrosion resistance.

Installing and using LevelUPTM Roller Mounts is super easy, and frankly kind of boring after a while when you realize roller adjustments are seldom needed after the initial setup. But if you ever do need to adjust a LevelUPTM Roller Mount, it will be quick, accurate, and easy to do.

Thanks to all who have purchased LevelUPTM Roller Mounts! I hope you love them as much as I do!

Thanks to Mike Rollins for shooting the video below:


Tuesday, October 22, 2019

Laguna Seca Wrap

What a blast! A huge thank you to all who made the Miata Reunion such a wonderful experience! All of the vendors and support staff obviously worked very hard to put together a world-class event. The weather couldn't be better, and everyone I met were enthusiastically having a good time.

Mazda had a great display in honor of the 30th Anniversary of the Miata, and brought along some cool show cars, like this NA Miata coupe prototype:


My car was a hit - it was the only Flyin' Miata-built V8 car at the event, though there were a couple of other V8 cars there, they were more track-focused, like this Monster Miata from Woodstock Motorsports:


Truly a monster with an ITB intake setup on a wild Ford small block. He broke a LF suspension joint on Sunday while giving a ride and was super lucky it happened in a slower speed section of the track; there wasn't even any body damage I could see.

On Saturday my main focus was getting a ride with a pro driver in order to learn track lines and relative limits before taking my car on track Sunday. I struck gold and was ready to go when Ryan Passey had an open seat available in Good-Win Racing's "Budget NC" project car. Ryan's home town is Monterey, so he has logged thousands of laps on Laguna Seca. In fact, he had just set a new lap record the day before in this car:


Ours was only a two-lap run, but I was able to learn much about the track in that time. First impressions were that there was a tremendous amount of grip available in most corners - the elevation changes and cambering make the track flow through the lap, and there are no super high speed sections like the back stretch at Road Atlanta. It was also exceptionally smooth, with excellent curbing and transitions - and fun! I haven't had as much pure driving fun *ever* as I have on Laguna Seca.

I've been to enough track days to know that patience and planning make for the best on-track experience. Below is the best session of the five I had on Sunday. I was finally able to pass a few cars towards the end, so skip forward to around 20:00 for some action:


Miata Reunion hired a good track photographer to record the event and I have a few favorites...


The Corkscrew!


The trailer performed flawlessly, and never scraped the pavement during the trip; anywhere the Miata could go, the trailer had no problems with ground clearance. I was also able to back it into parking spots if needed. While in Monterey I stayed at the Motel 6 on Fremont (very nice for less than $100/night in Monterey) and they let me lock the trailer to a tree in the corner Friday and Saturday:


The car ran perfectly for the entire 5,150 mile trip, averaging 22.7 MPG, and burning one quart of oil. The exhaust took a beating on some sections of Route 40 crossing Oklahoma and Texas, but it had already been dinged up from prior run-ins with rough pavement. The cats take the brunt of it, as they are the lowest point of the exhaust system.

Now that I'm back in the saddle at work it's onto the next set of challenges, but I will be looking back on this vacation with fond memories for a long time to come, I'm sure!

Regards -

Friday, September 27, 2019

Track Trailer

Well, I've had the trailer done for a couple of weeks now, test driven it around Atlanta, and I must say that it is one of my better projects.


I knew I wanted something with suspension and larger tires for highway driving, so I started looking at some sort of coil-over setup, but then thought about a torsion axle design for simplicity. Then I found Timbren Axle-Less Suspensions and learned that they are built so well that I could use them as a structural member for this light weight trailer. In the photo above you can see that the front and rear halves of the trailer are bolted to the suspension on each side. Initial tire alignment was close, and with the included shims I was able to adjust toe, track, and camber easily. Note the rubber strip on the front of the storage box - my first test drive was in the rain, and some water got in through the hinges - not any more!


The tire rack in front is only 6" off the ground in order to keep the tires below the spoiler in back. I didn't want to be pulling a big sail behind me on the highway. I made the track width the same as the car so it will track well in the rain. The Rubbermaid cargo box carries my floor jack, jack stands, tools, and a few spares like brake pads and such. The weight balance came out pretty good - there is about 35 lbs. of tongue weight with the trailer fully loaded, and I figure it's around 300 lbs. total.


The trailer is built with a combination of 3/16" wall tube and angle in the higher stress areas, and 11 gauge steel for the tongue and rear frame. I found aerosol touch-up paint to mach the car at  automotivetouchup.com, and gave it five light coats of color and three medium coats of clear. I purchased the hitch, lights, straps, fenders, wheels, and suspension at etrailer.com. I found the storage box online for half price due to a supposed blemish (which I still haven't found). The tires were purchased at a discount from my local supplier I use at the golf course, and I had them balance the wheels for smooth running.

Registering the trailer was too easy - I only had to pay $5 for a serial number plate, have a police officer verify the plate was permanently installed (riveted), and then pay $12 for a tag. Nobody even checked if the lights worked!

Now I'm all set for my trip to Laguna Seca! I serviced the car and it is all set to go. I'll be driving an average of 500 miles a day for ten days starting October 8th!

Regards,


Friday, August 23, 2019

Summer Update

This season has been especially busy it seems, with all courses getting intensive cultural practices in the month of July, followed with intensive machine and cutting unit maintenance in August.

I have been running the grinders this summer, and have gotten back into the "production mode" I established in Florida; I can run cutting units through my SIP grinders almost as fast as a man can set them up on the bench.

On a personal note, I was lucky enough to get registered for this year's Miata Reunion at Laguna Seca in October. This is a true "bucket list" thing for me, as I have long wanted a chance to drive that track. Also, I was born in Southern California and spent my early childhood in Anaheim. I remember taking drives up to Big Sur and playing in the surf as a young boy. This is the last year for Miata Reunion at Laguna Seca since Mazda has discontinued their sponsorship of the track - it is now known as "Weather Tech Raceway Laguna Seca". This year is also the 30th anniversary of the Miata, so there is a special buzz around the event.

This leads to the question of how am I getting the car and all my track gear out to California from Atlanta? I'm driving, of course! It's a three-day trek each way, and I'll be spending four days in California. Oklahoma City, OK, and Flagstaff, AZ are my intermediate stops. 

To transport all my track gear I have decided to build a trailer. When I go to my local track days I change tires at my shop and drive on the slicks to and from with no issues because the tracks are close, but there's no way I would ever be able to do that cross country. There is a company selling a range of track trailers, Leroy Engineering, which are great, but a bit out of my budget (this trip is going to tap out the till for the year - I haven't been to the track since April).

I will go into the trailer construction in a later post, but here is a teaser:


Regards,

Monday, January 21, 2019

Surface Plate

I've just posted a new short video on setting up cutting units on the surface plate:


Of course as soon as I published this I thought about something I missed - set the height of cut after paralleling!

Regards,

Tuesday, January 15, 2019

Beaver Power!


Note to equipment manufacturers: If you are not going to spend the (small amount of) money on sealed electrical connectors, at least coat the terminals with dielectric grease prior to assembly! One thing that really irritates me is when a factory made unsealed electric terminal fails due to corrosion, especially when the machine is only three years old! We operate our turf equipment outside in the elements! Okay - rant over...

I finally found a good source for the snap-in terminals found in the unsealed connectors used in some circuits like glow plug and fuel cutoff solenoids. I had previously located the .250" tabs and receptacles, but was having a hard time tracking down the larger .312" pieces used in the high power (glow plug) circuits.

Set up primarily to supply the large motorcycle aftermarket in Japan, Eastern Beaver has sourced the best O.E.M. grade terminals used on the Denso components used by engine manufacturers, as well as most Japanese cars. They also carry high quality crimping tools, and the Carling Contura rocker switches used in most turf equipment these days.

Shipping from Japan can take a while, so I suggest using the Express Mail Service (EMS) option to get your package in less than a week. I was able to get a good selection of terminals for less than $25.

Oh, and we are now preemptively going over all of the other connections in our three year old fleet...

Regards,